¶ Setting Up TeamViewer
The install file for TeamViewer is available on their website at this link. This software will serve as the main access point for our support staff to provide you with assistance while you are on Pro. It will let them see and interact with your screen to help diagnose problems and train on best practices.
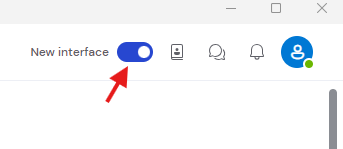
Once you have downloaded and installed TeamViewer, you'll want to revert to the classic interface by clicking the toggle on the upper right part of the screen.
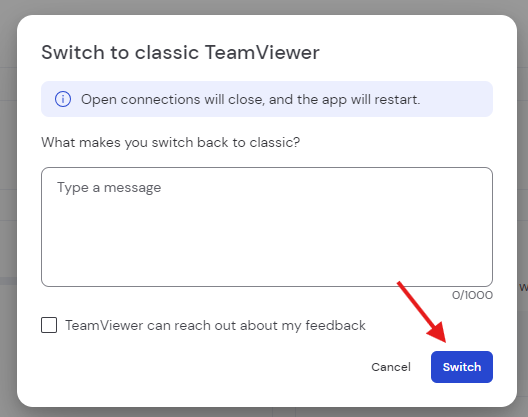
TeamViewer will tell you it needs to restart to implement the change. If it asks you to tell them why you are using the classic interface, skip it by pressing switch.
¶ The Quick Way
When it's rebooted with the classic interface, you will see a section called "Allow Remote Control" with 'Your ID' and a 'Password' on the left that looks like this.
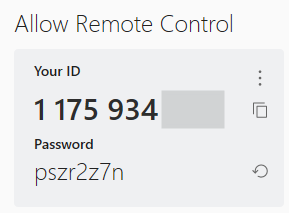
The ID displayed there is a unique ID for that particular computer. The password changes randomly throughout the day, and every time someone uses it to remote in to your computer. Reach out to support or to your sales representative and give them that ID and password, and they will remote in to your computer and get it set up for you. Easy peasy. If you've got time and are feeling brave, you can do a full setup on your own using the steps below.
¶ The Full Way
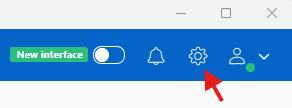
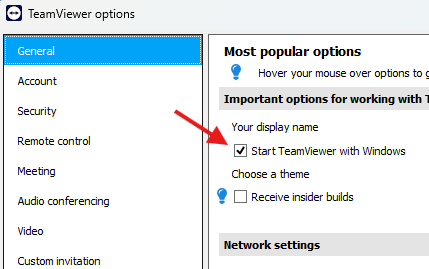
To get started, click the 'Gear' icon on the upper right part of the screen. This will open settings.
You'll want to make sure TeamViewer turns on every time the computer turns on. This option is indicated by the checkbox that reads "Start TeamViewer with Windows" in the general settings category.
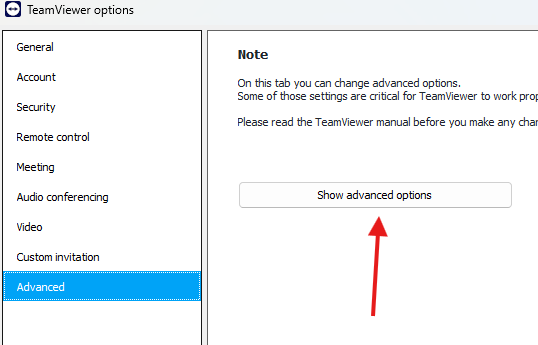
Next, click the "Advanced" section on the category list on the left side of the options window. It will ask you to confirm that you want to see that section with a button.
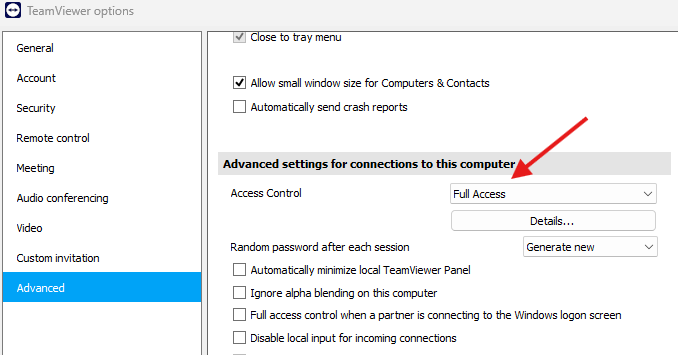
The first feature we want to confirm here is that you allow TeamViewer to have full access. This will allow a support agent to control the mouse and keyboard remotely so they can fix problems as if they were sitting right there at the computer. Ensure the "Access Control" feature is set to "Full Access"
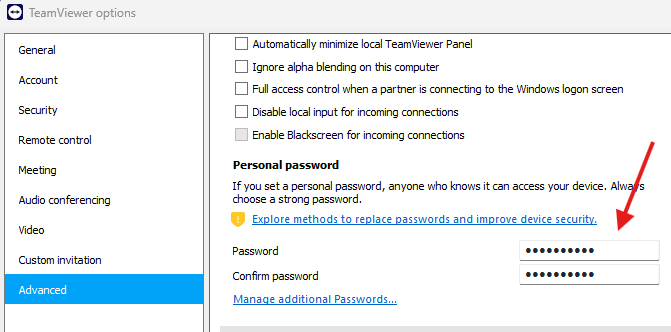
Next, scroll down to the section that reads "Personal Password". This will allow you to create a password that never changes the way the one you saw on the main screen does after a support agent logs in. Set a password you'll remember.
When you're done, click 'Ok' and close the options.
Now you have an ID for the computer (displayed on the main page under "Your ID"), and a personal password. Notify a support agent or your sales representative that this step is done and provide them with the ID and your personal password. They will be logged into our support tool so that when you need help, we can remotely log in and see what you're seeing and provide assistance.
You will need to do this for every computer that will be running Positrak Pro. Each computer will have a unique ID. Provide a nickname for each computer (for example. "Office", "Counter Right", "Cash Drawer"), and submit the nickname, ID, and personal password to Positrak for safekeeping.
And you're done! Welcome aboard! From here, we can log in remotely and install Pro on each computer, pull your data to convert it, and provide ongoing support at the click of a button.